On IUDs and Ovaries – Being a Twin Mom and Kinda Wanting Another

I went to a closing on Friday, and the borrower’s adult daughter had her own children there. Towards the end of the closing, the baby woke up from her nap, so the daughter brought her out to the living room where we were signing. She was perfect. Two weeks old with a full head of hair and cherubic cheeks. She laid on her mother’s chest with that half-sleeping look of the very newly born. She looked straight out of an Anne Geddes calendar. My ovaries ached just looking at her.

Every two hours, I reminded myself. Remember when you had to feed them every two hours.

After I came home and we got our decidedly not-new babies to bed, I told my husband about this perfect baby. We had a few drinks and talked about what it would be like to have more children. What if we had another set of twins?

By the end of the evening, we had somehow decided we would have another set of twins, but girls this time. We picked out names – Rivka and Ruchami, with Avital as a potential middle name for one of them. Because clearly those names will cause no issues for kids growing up in South Carolina.

At 6am, our actual twins woke up and reminded me why I’m thankful for my IUD. Not only is it one less pill for me to forget to take in the morning, it also prevents me from making snap decisions regarding reproduction. Since our discussion took place on a Friday night and a doctor’s appointment would be required to remove it, my IUD gave me an entire weekend of sick toddlers to remind me of why now is probably not the time for more kids. Between comforting the sicker kid while his brother raged over the lack of attention and checking our bank account to see that we can’t afford my student loan payment, let alone two more kids, I think it’s the right call.

Of course, Facebook and Google seem to be conspiring against me, posting “memories” from when the boys were tiny. Photos of Aaron sweetly sleeping on my chest. Photos of Adam peacefully dreaming with one arm out of the swaddle in a baby power fist.

Facebook and Google do not remind me that Aaron was sleeping on my chest because he wouldn’t stop crying and sleeping on me was the only way he’d sleep at all. They didn’t remind me that Adam had puked up all of the breastmilk I had painfully and slowly managed to extract to supplement their formula because my mom-guilt made me just keep trying to pump and produce more than the pathetic thimblefuls I naturally made. And they didn’t remind me about the way we had to feed them every two hours in those early weeks because they were preemies, but it took nearly an hour to coax them into eating just sixty milliliters, which we measured in milliliters because ounces seemed like too much to hope for.

And yet now they’re napping, and I’m looking at baby photos.

Every two hours, I tell my ovaries. Every two hours.

The Pizza Bible – A Review

I admit, I got The Pizza Bible by Tony Gemignani from Blogging For Books ages ago. I like cooking and we both love pizza, so it seemed perfect. Unfortunately, it arrived at an awkward time for us and got shelved for far too long. Recently, I was going through books that never made it on to our somewhat limited book shelf real estate and decided to take the plunge.

First of all, this book is not for casual pizza fans who want a new way to top a pizza. It really is a masterclass in the art of pizza making. The downside to that is that the recipes can call for some specialized ingredients that may not be available locally for many people. We absolutely could not find diastatic malt powder anywhere locally, even in Asheville. They also call for specialized equipment specifically for pizza making. For instance, Gemignani recommends using two pizzas stones in the same oven with one on the top rack and the other on the bottom to ensure the best cook for your crust. For those of us with limited kitchen space who don’t make pizza more than once a month at best, this can seem like a bit much.

The upside is that most of the specialized ingredients and equipment can be skipped if you don’t have them on hand and the recipes will still turn out great (though perhaps not quite as great as they would have with, for instance, two pizza stones and diastatic malt powder).

IMG_5207.jpg

Our first attempt was a classic Sicillian-style pizza with the classic Sicillian sauce from the book and our own goat mozzarella. The dough was definitely not something you want to try right off the bat if you aren’t already familiar with bread making. It also wasn’t a quick weeknight sort of dish. In fact, I started it on Monday and we didn’t make the pizza until Wednesday since the dough had to, not only rise, but also chill in the fridge for 24-48 hours.

The outcome was quite good, despite not having all of the materials called for by the book. I do think that the quality of the crust would have benefited a lot from the additions, but we still got a delicious pizza!

The recipes are clear and easy to follow. The beginning of the book also starts with a masterclass section that teaches you essential techniques. Even if you are completely irresponsible and just skip to the particular pizza you would like to make (*ahem*), the recipes refer back to those techniques along the way with page references, so it’s easy to look back to get a better idea of what you need to be doing.

Overall, I would definitely recommend this for anyone who is serious about pizza!

An Honest Review of Blue Apron

IMG_3059watermark

You’ve probably seen ads or paid reviews of meal kit delivery services like Blue Apron, Home Chef, or Plated. I certainly had seen plenty, but the price tag always stopped me from trying any of them out. However, some family came in May and they turned out to be subscribers to Blue Apron. Best of all, subscribers who have been with the service for a certain amount of time can give free weeks to new subscribers. I was in!

She did mention her trick to keep it somewhat affordable – Blue Apron lets you skip any weeks you don’t want very easily. She just skips most of the weeks and only gets deliveries on weeks that look really appealing to her.

Upon logging in for the first time, I was happy to see that they had more options than meat or vegetarian for your meal choices. I could specify what I don’t eat (for instance, pork) without limiting myself to vegetarian only. I was also happy that you could customize what meals you were getting beyond what they initially picked for you. One frustration however was that not all meals were available together. So if I didn’t like one of the suggested meals, I couldn’t just pick any of the others. They have six options every week, but I found that if I picked certain meals, others would be greyed out and unavailable. I suppose for people with no dietary restrictions or picky eaters in the family, it might not be a big deal, but between me keeping semi-kosher and John just being a bit…particular about food (I won’t say picky, but yeah, he can be a bit picky) I didn’t find a week that would work for both of us with the combinations I could choose until the end of July. Of course, there were some weeks I COULD have done, but I just don’t see grilled cheese with a side salad as worthwhile for a meal delivery kit. I don’t care how good the cheese is.

The first box we got had all vegetarian meals. We’re fine with eating vegetarian meals. Hell, I was a vegetarian for years. However, it’s worth noting that if you are paying for the service, it’s $60 for a 3 meals that serve 2 people each. For $20 a meal, I would probably want meat in at least one of my meals. However, this was a freebie, the meals all looked good, and I was anxious to try my first week.

The box arrived on July 30. The end of July was, as those of you in the South may recall, stupidly hot. However, Blue Apron says it packages the food so that it’s okay if it sits on your porch until you get home. We got home in the early afternoon and put everything in the fridge as soon as we unpacked it.

IMG_3010watermark

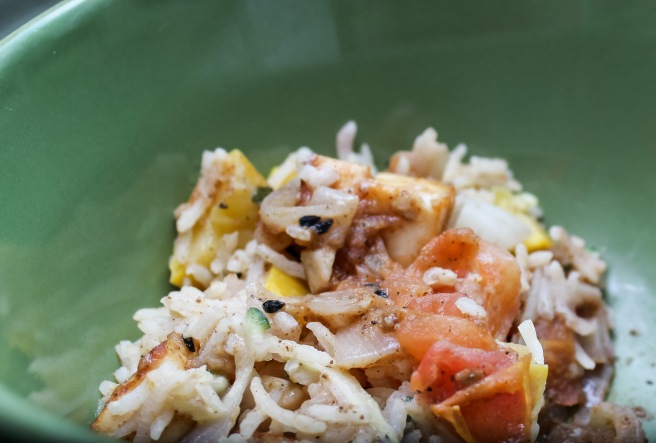
The following evening, we decided to try our first meal, Bhindi Masala (actually, more like bhindi paneer masala, but they just called it bhindi masala). It’s an Indian dish with okra and paneer cheese. We love Indian food, so we were looking forward to it. Their recipe was served over rice with Raita (a cucumber yogurt side). The first disappointment was a big one – we opened the okra and found this:

IMG_2918

Yes, folks, you are seeing that correctly. That’s moldy okra. And not just a slight hint of mold, it’s full-blown, chuck-it-immediately mold. Had we opened it towards the end of the week and found this, we would have been no less disgusted, but at least it would have made more sense. The was the day after the box was delivered, so this okra was going bad when they packed it.

We decided to soldier on and continue with the dish, substituting yellow squash for okra because, well, we had some. Of course, the resulting dish was certainly not bhindi masala (bhindi means okra in Hindi), but it worked.

We also had some issues with directions and ingredient portions. The raita called for the cup of Greek yogurt they included with the cucumber they sent to be grated into it. The issue was that the cucumber they happened to send was enormous! Raita is usually 1:1 yogurt to cucumber. Had was actually used the entire amount, we would have had a 1:3 or 1:4 ratio instead. There were a few other instances in the week where the directions didn’t entirely make sense or we both had to read them a few times to make sure we understood what they were asking.

Overall, our first meal was…okay. It certainly would have been better with okra instead of squash, but even given that it still wasn’t the most flavorful or memorable Indian meal we’ve cooked. And for a retail cost of nearly $20 a meal (that I have to cook!), I want something that’s going to knock my socks off.

[Imaginary image of empanadas because I forgot to take any pics]

The next meal we tried were Corn and Green Bean Empanadas. Blue Apron described the meal this way:

“Empanadas de humita,” or corn empanadas, are a tasty South American specialty that features flaky pastry dough wrapped around a savory-sweet corn filling. For our version, we’re adding seasonal green beans to fresh corn, then sautéing the vegetables with a blend of smoky spices. Inside, Monterey Jack cheese pulls all the flavors together and gives our filling enticing richness. A salad of crisp cucumber and cilantro adds bright contrast to the empanadas, which are even more delectable when dipped in our ajo (or garlic) sauce.”

These were pretty easy and good. It actually inspired us to make our own empanadas, though not because they were so great. We really felt that the green beans added entirely too much sweetness considering how mild the spices were. The ajo sauce with  crème fraîche would have probably been unnecessary, though the fact that the crème fraîche was pretty clearly spoiled (if it smells like your socks, it might be beyond).

IMG_3049watermark

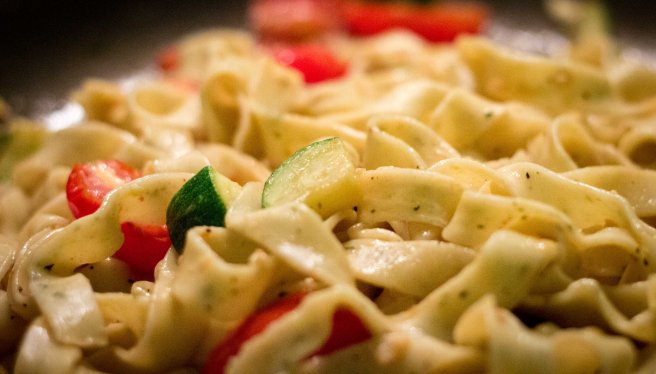
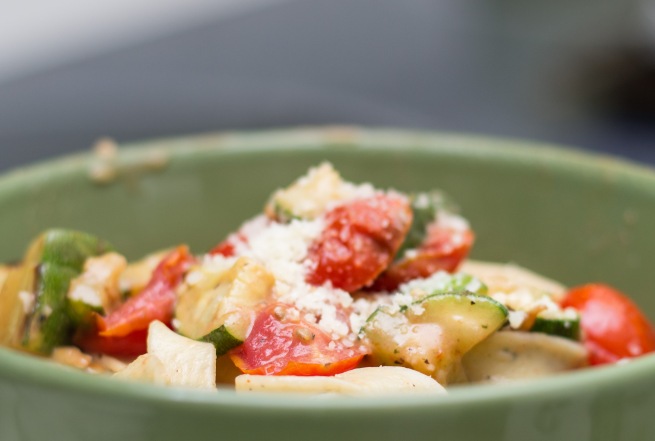
The last dish we tried was both the simplest and the best. It was a Fresh Basil Fettuccine with cherry tomatoes and zucchini.  It was a very simple pasta, but it was great. The problem was that it’s definitely the sort of thing we could (and often do) make on our own for $10 (or less, depending on the pasta we use) for the both of us (with leftovers).

OVERALL: Blue Apron is not for us. We had issues with the quality of their ingredients, though I suspect that was a fluke issue. However, even if they delivered great, incredibly fresh ingredients every time, I don’t think we could justify the price tag. $60 a week for 3 dinners to feed 2 people is pretty high. For $20 a meal, we could easily go out somewhere and get about the same caliber of food, if not better. We already cook often and are pretty adventurous in the kitchen, with some of our staples including dishes from a wide-variety of regions. We live close to a store (so having it delivered is not a huge bonus) and the meals really don’t cut down on cook time at all as you still have to chop all of the vegetables (not to mention doing dishes afterward).

However, I do think that these meal kit deliveries are probably great for some people. People who often eat out might enjoy a night in cooking, particularly if they don’t often cook for themselves. People who live far from places they can buy a variety of fresh ingredients might love the delivery. And people who feel stuck in a food rut might enjoy the change of pace brought by some of these recipes.

Although I certainly enjoyed trying it and I see why others might like these services, they just aren’t for us. If there were options to only get one or two meals, I might be more inclined to do it, but as of now the cost just doesn’t make sense for us even if we do only do a week a month.

FYI: I did complain about the moldy okra. I was given an apology and $9.99 off of my next (first) week of meals. Considering that’s one person’s portion of a meal I’m making myself, that felt a bit cheap to me. Considering the main ingredient (bhindi in bhindi masala) was clearly spoiled, I feel that a full meal (about $19.98) from the next week would have been a better solution.

101 Things in 1001 Days

I recently saw a list someone had compiled of 101 things they wanted to accomplish in 1001 days. Apparently, this is a “thing” and there were quite a few lists out there as well as some sites to help people make and keep track of their lists. It seemed like a good way to set goals and push myself to achieve more, especially in terms of personal projects. I made my list on Day Zero Project, which is a pretty good resource for list making in general, if you’re into that sort of thing.

I only finalized my list today, so I thought I would share it. I have until October 19, 2018 to complete my list, so I tried to choose a good variety of goals. Some are relatively simple tasks that just require I take a little time (Take a hike), while others are fairly lofty (Learn Spanish to a conversational level). I tried to keep most of my goals somewhere in between, so I focused on things that would take effort and give me a sense of accomplishment but wouldn’t feel insurmountable. Just making the list was actually fairly difficult, but it was a useful way to evaluate things that are important to me and what I want to have more of in my life.

So, here it is – Ariella’s 101 Things in 1001 Days List!

1 Learn Spanish (to a conversational level)
2 Knit a pair of socks
3 Take an art class
4 Make a hard cheese
5 Attend ADGA Nationals
6 Write a new song
7 Keep a journal for six months
8 Write a short story
9 Touch a penguin
10 Spend a day without technology
11 Organize my craft room
12 Declutter my house
13 Sort out my wardrobe and donate any old clothes
14 Make pasta from scratch
15 Paint a canvas
16 Write a letter to myself to open in 10 years
17 Write a letter to three people who have made a difference in my life
18 Reconnect with an old friend
19 Meet an online friend in person
20 Learn a new soap swirling technique
21 Buy a house
22 Take a new photo session and edit the photos
23 Embroider a challah cover
24 Buy a seder plate
25 Make more candles
26 Take a real estate CLE
27 Practice singing
28 Donate $5 to charity for each task I don’t complete
29 Write on 20 creative writing prompts. http://creativewritingprompts.com/
30 Create a budget and stick to it for 4 weeks
31 Don’t say anything negative for three days
32 Find a personally inspirational quote and work it into a piece of art or home decor
33 Make a list of 101 quotes that inspire me
34 Take a picture for each letter of the alphabet
35 Start an indoor herb garden
36 Do some volunteer work
37 Host a dinner party
38 Host a barbeque
39 Go ice skating
40 Reach my goal weight
41 Take a cooking class
42 Raise my own chickens
43 Improve my Hebrew reading ability
44 Go camping
45 Go hiking
46 Learn to crochet
47 Complete a 1000 piece puzzle
48 Support a kickstarter project
49 Go on a picnic
50 Read the Zohar
51 Read a book a month for a year
52 Open an etsy shop
53 Build a milk stand by myself
54 Go sledding
55 Learn a new knitting technique
56 Visit a state I’ve never been to before
57 Make mini challah loaves
58 Donate blood
59 Go vegetarian for a month
60 Make a cleaning schedule and stick to it
61 Put away $10 for every goal completed
62 Breed a goat who scores 89 on LA
63 Grow an orchid from a seedling
64 Knit a blanket
65 Sew an article of clothing
66 Be Shomer Shabbat for a month
67 Complete a game of monopoly
68 Make a cheesecake for my husband’s birthday
69 Visit the American Southwest
70 Play bass for 1 hour a week for a month
71 Knit a scarf
72 Paint a room mint green
73 Complete a coloring book
74 Destash unused craft suppplies
75 Make lotion
76 Make a shaving soap
77 Make body butter
78 Make bath fizzies
79 Buy/make a bathtub tray
80 Plan meals for a week and do all of the shopping on Sunday for a month
81 Rejoin a gym and go at least twice a week for 6 months
82 Decorate my house
83 Get a raise
84 Pay off my credit cards
85 Get a KitchenAid Stand Mixer Attachment
86 Lose 10 lbs
87 Buy life insurance
88 Do a brewery tour
89 Visit 5 new cities
90 Take a class with my husband
91 Learn to make pho
92 Paint a watercolor picture
93 Visit the Linville Caverns (North Carolina)
94 Complete a Mindfulness-Based Stress Reduction training course
95 Make a year collage for every year John and I have been together
96 Print, frame, and hang our year collages
97 Have a permanent champion goat
98 Dont drink alcohol for one whole month
99 Read 10 classics I should have read but have never got around to
100 Try meditation
101 Enter a soap in the Soap Challenge Club

www.dayzeroproject.com/user/ariella42/list/114580

If you happen to create your own list, I’d love to see it!

Rest In Peace, Nellie

We hadn’t had Nellie long, but she had already made herself a big part of our herd. She was a beautiful Alpine doe in milk we bought from Sunrise Farm. She scored well on her Linear Appraisal (a type of judging for registered goats) and was our best milk producer. We were looking forward to starting our Alpine herd with her and seeing the kids she would produce for us. We were also looking forward to watching her grow and mature as she was only a yearling.

Her best feature, though, was her lovable and loving personality. She had already become a favorite around here for being one of the first in line for chin scratches and for wanting to be friends with everyone she met, human and goat alike. She even semi-adopted the Nubian kids we recently got (though she didn’t let them nurse nearly as often as they would have liked), and I would often go out in the morning to find the three of them in their own goat pile.

This morning, there were signs she had been scouring (diarrhea) during the night and she didn’t eat as much as usual while being milked. I thought she had overindulged in the new hay, so I gave her some probiotics and asked John to keep an eye on her. I got a call this afternoon that she was having trouble walking. I told him to call the vet while I drove home. By the time I got there, she was convulsing. The vet was not available, and the next closest vet who treated goats was in Marion. My goat friend and Nellie’s breeder, Ziggy, suspected enterotoxemia and rushed over with CD antitoxin, but it was too late. She died in my arms.

John and I are both second-guessing each of our decisions today and feeling guilty about her death. But we both know that’s not productive. We’re trying to focus on finding answers and preventing anything like this from happening in the future. We took her body to the NC Diagnostic Veterinary Lab after she passed, so we hope to have some answers soon.

We were so lucky to have Nellie in our lives, even if it wasn’t for nearly long enough. I’m heartbroken right now, but I hope that some day we’ll be blessed enough to have another doe with the beauty and personality of Nellie.

Rest in peace, dear, sweet Nellie.

We Moved – Hello Saluda!

We survived the great move of ’15. For those of you who don’t know, we moved from near Brevard, NC to Saluda to be closer to my office. I’ve cut my commute by half, which is awesome. However, the big bonus with the move is that we’re now on 7 acres (and the landlord has no problem with livestock). The previous tenants didn’t care for the house and it’s in need of some repairs and updates, but we’re going to be doing a lot to the place in the next year. The house may have some downfalls, but the land definitely makes up for them. Here are some photos, but please don’t judge us by the boxes and mess. Hopefully everything will be completely unpacked and arranged soon.

The land even has a small apple orchard on it that’s apparently still producing. My (hopefully) epic garden will go in next to it. I know, I know. I’m getting started very late this year, but the WV bar and move kinda messed with my gardening schedule. By the way, if anyone local has a garden tiller, I would LOVE to borrow it to break ground on the garden.

Here’s our main living area.

Here it is from the other side.

The kitchen (I was in the midst of unpacking that most important of rooms when I took this).

Front room, which will house my office and a few instruments.

The bathroom is a little dated (and Carolina Blue), but I think some white paint on the walls will do a lot of good. I just wish I could drop a nice tub in there for baths!

The previous tenants made some, um, interesting design choices. This one will likely be the craft room.

The Dora room will be a pain to paint, but I think it will eventually be a guest/exercise room.


Our bedroom has the least interesting paint job, which is probably a good thing. We’ll just need to fix the closet and throw some white paint on the walls.

The view from the bedroom is great!

There’s also an entire floor downstairs, but it’s mostly unfinished at the moment. I’ll probably post some of those later (especially since Beth might be kidding in the basement if we don’t get a small barn up soon).

Easy Savory Turkey Brine Recipe

Easy Turkey Brining Recipe

We made a turkey last night and had a few people over. A lot of people complimented our turkey, so I thought I’d share my brine recipe. I apologize for not taking pictures last night – you’re stuck with the terrible photo of our turkey from last year instead.

Brining a turkey isn’t difficult, but it does add time and a few extra steps to the process. However, the juicy, tender results are more than worth the extra effort. You’ll need a container large enough to hold two gallons of liquid plus the turkey. We use a food-grade 5-gallon bucket like this one. You can buy one online or at most major hardware store. Just make sure that your bucket is labelled food-grade to prevent any contaminates from entering your delicious meal. You can use a large stock pot, but keep in mind that a 15 pound bird will displace a lot of liquid, so make sure you have plenty of room for everything.

You will also need a cool location to store your bucket after you put your turkey in the brine. Ideally, you should store it in a cold fridge, however not everyone has the luxury of that much fridge space. If you cannot fit the bucket in your fridge and live in a relatively cool place, you can store it in a location such as your garage or basement, so long as the temperature stays below 40 degrees. Remember, this is raw poultry, so please keep safe food-handling in mind.

Many brines use sugars, which are supposed to help brown the skin. Keeping the bird savory was our priority, so we left out any sugar and just coated it in olive oil before putting it in the oven to crisp up the skin. Here are the ingredients we used.

  • 1 gallon vegetable stock
  • 1 cup finely ground salt
  • 2 tbsp dried rosemary
  • 2 tbsp dried thyme
  • 1 tbsp dried sage
  • 1 tbsp dried savory
  • 6 cloves garlic, minced
  • 2 bay leaves
  • 1 gallon ice water

Throw the vegetable stock and all of the spices in a stock pot and bring to a rolling boil. Once you have a good boil going, remove it from the heat and let it cool to about room temperature. Once it’s cool, put it in your bucket (or brining apparatus of choice) and add the ice water. Now, submerge the bird with the breast cavity down (drumsticks pointing up) and make sure the cavity gets filled. If the ends of your legs are above the liquid, that’s fine. However, if you have a very large bird, you may need to add more stock or salt water to cover the meat.

Put the bucket in your fridge or a comparably cool location for 18-24 hours. Remove your turkey from the brine. Don’t worry – it will look bloated and not terribly appetizing at this point, but it will cook beautifully. Some people recommend rinsing the turkey before cooking it, however we’ve found that it isn’t necessary and the remaining herbs and brine just add flavor.

Place your turkey on your roasting pan, season as desired, and cook with your preferred method. In seasoning the turkey, adding salt generally isn’t necessary with a brine. We simply coated ours in olive oil and gave it a few turns of our pepper mill.

A couple of notes – don’t stuff a brined turkey. Well, you can if you want, but expect a salty stuffing. There are other good reasons to cook your stuffing separately (at which point it technically is dressing), but if you’re dying for a stuffed turkey, wet brining might not be the way to go. Also, if you’re making gravy from your pan drippings, take into account the amount of salt already in the dripping from the brine. We failed to mention that to my wonderful aunt who made gravy at our get-together. The gravy was good, but a bit on the salty side.

Savory Turkey Brine

  • 1 gallon vegetable stock
  • 1 cup finely ground salt
  • 2 tbsp dried rosemary
  • 2 tbsp dried thyme
  • 1 tbsp dried sage
  • 1 tbsp dried savory
  • 6 cloves garlic, minced
  • 2 bay leaves
  • 1 gallon ice water

1. Pour your vegetable stock into a stock pot. Add all spices and bring to a boil.

2. After reaching a rolling boil, remove from heat. Let stock mixture cool to room temperature.

3. Once cool, combine stock mixture and ice water in food grade bucket.

4. Submerge turkey, breast cavity down, in bucket, ensuring that the brine fills the body cavity.

5. Place in refrigerator or comparably cool location for 18-24 hours.

6. Remove from brine. Season and cook as desired.

Sugar Rush: A Must for Bakers!

Sugar Rush Baking Cookbook Review

I love baking, and I tend to do a lot of it around the holidays. This year, I picked up a cookbook called Sugar Rush before the baking madness began, courtesy of Blogging for Books. Unfortunately, I got sick during prime baking time, so I didn’t get to make nearly as many goodies as I intended to. However, Sugar Rush is a gem of a book for bakers or anyone who wants to learn more about the art of baking, and I know I’ll put it to good use next year. The book covers the basics of baking (spoon flour into your measuring cup and level it off to measure) to more advanced types of baking (inverted puff pastry, anyone?). The recipes also run from simple cookies to complex pastries. Whether you’re looking for a recipe for Killer Chocolate Chip Cookies or Earl Grey Creme Caramel, you’ll find it in this book. The best thing about Sugar Rush is that, unlike many cook books, it doesn’t just tell you how to do something, it shows you with tons of great photos throughout the book. I highly recommend this book to anyone who wants to take their baking to the next level or just learn some great new recipes.

Ariella’s Walnut Biscotti Recipe

Ariella's Walnut Biscotti Recipe

A few years ago, I lost my sweet tooth. Don’t ask me what happened or what I did; I just stopped craving sweets. Granted, I still have plenty of culinary vices left (did someone say cheese?), but sweets are no longer among them. I’ll still have the occasional slice of pie at holidays and such, but I no longer seek out the sugary stuff. However, I do still adore baking. The holidays are one of my favorite times of the year, partially because I can go all out of the baking and there will be plenty of people to partake. I’ve been making this Walnut Biscotti recipe since grade school, and it’s still one of my all-time favorites. Not only is it a crowd pleaser, but it’s also one of the few sweet treats I make that I enjoy eating myself. It’s sweet but not overpoweringly so, and it pairs wonderfully with a cup of hot tea or coffee in the morning.

Ariella's Walnut Biscotti Recipe

I have no idea where this recipe originally came from, since all I have is a handwritten piece of paper that’s now so worn it’s actually soft. I’ve had numerous requests for this one over the years, so I thought that I should go ahead and put it here, since I know I won’t be able to hang on to that piece of paper forever. A concise, printable recipe is at the bottom of the post.

While this recipe is a bit more involved than, say, your average drop cookie recipe, it’s really not difficult at all. It also doesn’t require many ingredients that you likely don’t have in your pantry anyway. Generally, the only thing I have to go out to buy for this is walnuts. Here are the ingredients.

  • 1 1/2 cup all-purpose flour
  • 3/4 cup sugar
  • 3/4 cup rolled oats, uncooked
  • 2 tbsp yellow cornmeal
  • 1 tsp baking powder
  • 1/2 tsp cinnamon
  • 1/8 tsp salt
  • 2 large eggs, beaten
  • 1/4 cup butter, melted
  • 1 tsp vanilla extract
  • 3/4 cup walnuts, chopped

First of all, mix all of the dry ingredients except for the walnuts. Next, you just stir in the wet ingredients. Finally, add the walnuts. You can get pre-chopped walnuts, but I prefer my walnuts to be a bit more finely chopped than those generally are. If you use pre-chopped walnuts as is, just keep in mind that you’ll have to be a bit more carefully when you slice the biscotti to prevent breaking and crumbling.

One you have everything mix up, you’ll need to divide the dough in half. Have a floured surface ready to roll on. I also recommend flouring your hands prior to handling the dough as it’s quite sticky. Take each half of the dough and roll it out into logs about 12″ long and 1 1/2 – 2 inches in diameter. It’s not an exact science by any means, but try to get them to about the same diameter so they cook evenly. This recipe can easily be doubled, however, I recommend dividing the dough into quarters and making 4 logs if you double it, so that you don’t have to adjust the baking time or temperature.

b11

Put them onto your cookie sheets. I always use Reynolds Wrap Non-Stick Foil  on top just because nothing sticks to it and it makes clean-up a breeze (and no, this isn’t a paid advertisement; I just love the stuff). However, if you use foil or dark cookie sheets, keep and eye on the bottoms to make sure they don’t get too brown. Bake in a 350° oven for about 25 minutes, checking occasionally (preferably via the oven windown instead of opening the oven door) to make sure they’re cooking evenly and aren’t getting too brown on the bottom. If your oven cooks unevenly, like ours, I recommend turning the cookie sheets at the 15 minute mark to ensure more even cooking.

b10

Once they’ve reach a light golden brown, take them out and cool them for about 10-15 minutes on wire racks (or dish racks that have been cleaned, dried, and turned upside down). Don’t turn off the oven yet! The loaves will be fairly soft at this point, so be careful transferring them to the rack. Don’t worry – they will get harder as they cool, plus they still have one more phase of baking to go through.

b9

Once your loaves are cool, break out your cutting board and best serrated knife. If your “best serrated knife” is obnoxiously dull, you can try a very sharp non-serrated blade, but expect more crumbling. Cutting the biscotti is, in my opinion, by far the most difficult part of the process. Take your knife and cut the pieces diagonally across the loaf in about 1/2 inch slices. Between the walnuts and the oats, the recipe can get a bit crumbly at this phase. Unless you have a very steady hand and extremely sharp serrated knife, expect to lose a few pieces to breakage. Don’t despair, though! Biscotti crumbles are every bit as delicious as the whole pieces (plus you can always tell yourself those little calories don’t count).

Ariella's Walnut Biscotti Recipe

Take your slices and crumbles and place them back on the cookie sheet with the cut side down. Put them back into the oven for 6-8 minutes per side. Once they start crisping up, you can take them out. Don’t expect them to have the crunchy biscotti texture at this point – they’ll get that once they cool. One of the best things about this recipe is that you can keep the biscotti for a few weeks and it just gets crispier, which, for biscotti, is a good thing. Now all you have to do is sit back, grab a nice cup of hot tea or coffee, and enjoy your delicious Walnut Biscotti. Oh, and try to keep everyone else from eating all of it.

Ariella's Walnut Biscotti Recipe


Ariella's Walnut Biscotti

  • Servings: about 3 dozen
  • Print

  • 1 1/2 cup all-purpose flour
  • 3/4 cup sugar
  • 3/4 cup rolled oats, uncooked
  • 2 tbsp yellow cornmeal
  • 1 tsp baking powder
  • 1/2 tsp cinnamon
  • 1/8 tsp salt
  • 2 large eggs, beaten
  • 1/4 cup butter, melted
  • 1 tsp vanilla extract
  • 3/4 cup walnuts, chopped

1. Preheat over to 350°.

2. Combine flour, sugar, oats, cornmeal, baking powder, cinnamon, and salt in large bowl.

3. Stir in eggs, butter, and vanilla. Stir in nuts.

4. Divide dough in half. On floured surface, roll each half into approximately 12-inch long logs, about 1 1/2 inches in diameter.

5. Bake on cookie sheet for 25 minutes or until light golden brown.

6. Cool on wire rack for 10-15 minutes. Leave oven on.

7. Cut logs diagonally with serrated knife into 1/2 inch slices.

8. Arrange cut side down on cookie sheet. Bake 6-8 minutes per side until crisp.

Tacolicious Cookbook Review

Tacolicious Mexican Food Cookbook and Recipes Review

Almost two months ago, I received a copy of Tacolicious from Blogging for Books. A cookbook devoted to Mexican food, particularly tacos, seemed right up our alley as both John and I love Mexican food and make it on a regular basis. The book itself has tons of gorgeous, mouth-watering photos, which is always a plus in a cookbook. I felt that I would have preferred more recipes for tacos or other entrees and fewer cocktail and snack recipes, however we quickly found several recipes we thought we’d definitely try for dinner. Unfortunately, over the course of these two months, we have yet to try a single one. We have the cookbook sitting on the kitchen counter with those promising recipes marked, however, for some reason, we just haven’t gone for it. Why? Perhaps it’s partially the changing season. With colder weather, we’re more inclined to make a hearty chili or slow-cooker Mexican-style beef than tacos. Also, the recipes that immediately seem to be quick, easy, weeknight recipes are mostly ones that either don’t really require much of a recipe or ones that we already have a good recipe for. I make my own taco seasoning for quick ground beef tacos, so I don’t really want to make up a batch of the more basic taco seasoning in the book to try their version of the same thing.

Will we eventually try a recipe or two? I’m sure of it. The Tangy Achiote-Rubbed Grilled Chicken Taco looks delicious, but it will probably get made once we’re back in grilling mode again. However, I don’t think it’s ever going to be a go-to cookbook for us. If you’re the type of person who likes having parties, though, this book could be great. They do cover all of the bases for a great Mexican-themed get-together from hors d’oeuvres to cocktails. We keep thinking about having a small party over here, but then we look at the house and think, “Man, that’s a lot of cat hair to clean up.” Perhaps by Cinco de Mayo we’ll be motivated to both clean the house well enough for company and make some of the great-looking recipes in this book.